Custom QR Code Signs for Restaurants and Small Businesses
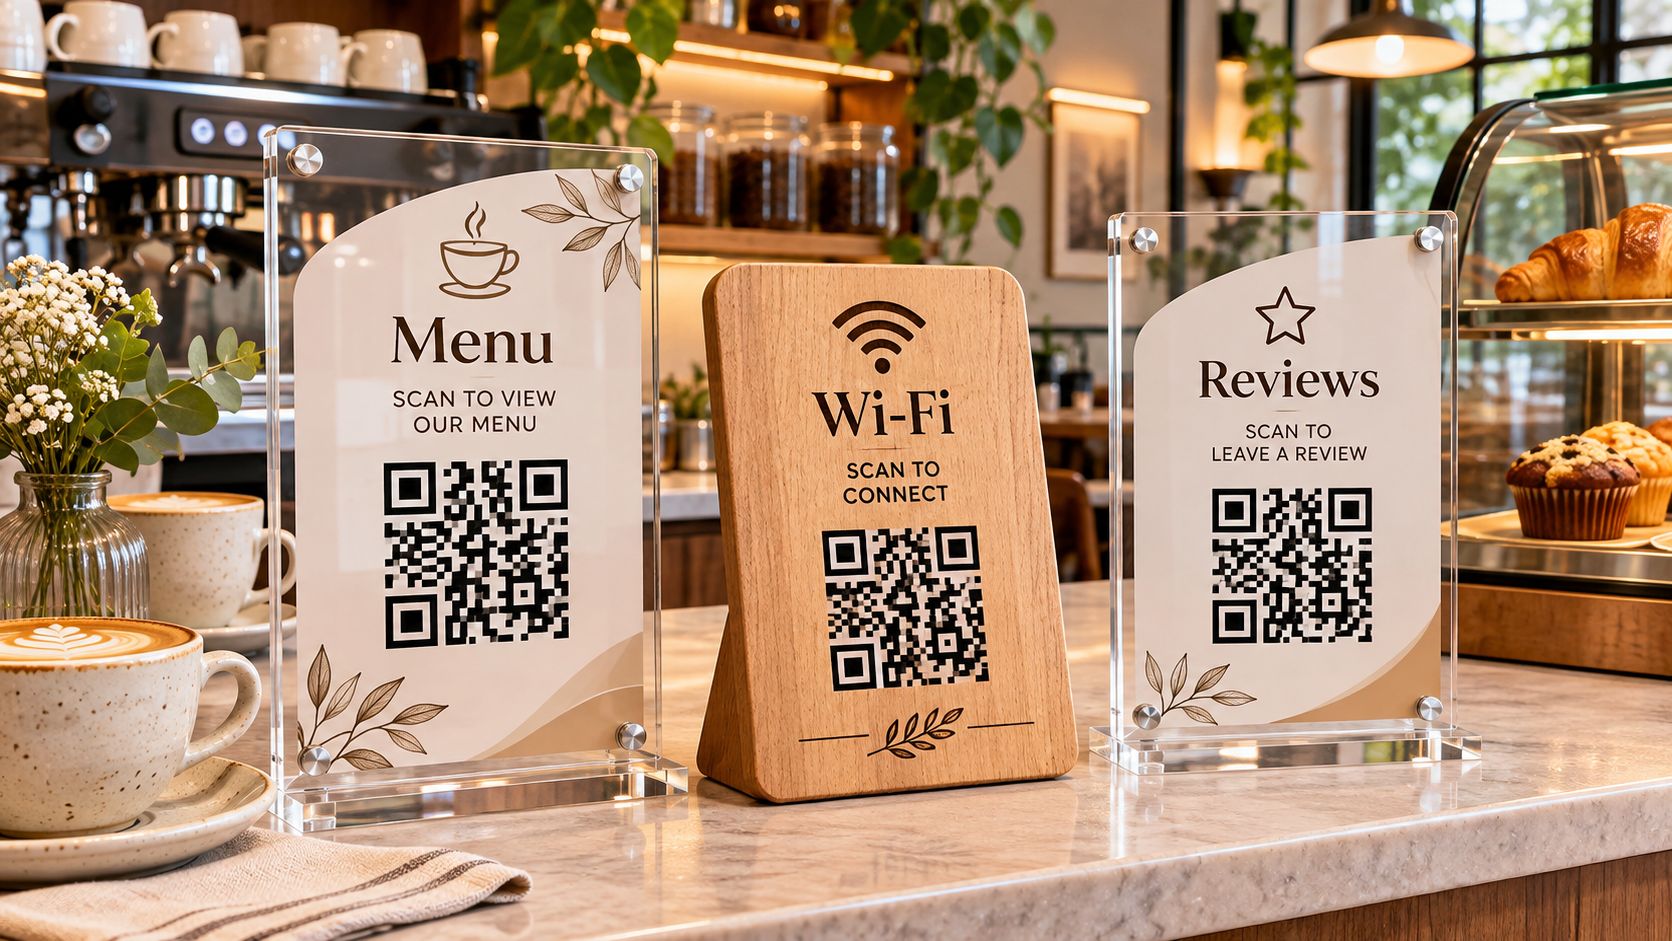
Custom QR code signs give restaurants and small businesses a simple way to connect a physical space with a digital destination. A table sign can open a menu, a counter display can direct customers to a review page, and a small acrylic stand can provide guest Wi-Fi details or booking information. For print shops and personalization businesses, these signs are practical UV printing products. They can be made in short runs, customized for individual locations, and produced with consistent brand artwork on materials such as acrylic and suitable wood. The important difference between a QR code sign and an ordinary decorative sign is function: the code must scan reliably after it has been printed, finished, handled, and placed in its real environment. A visually attractive sign is not a successful product if the customer cannot scan it. Quick answer: You can make custom QR code signs with a UV flatbed printer by printing a verified QR code and the business artwork directly onto a compatible acrylic or wood blank. Prepare the QR code as a clean vector or high-resolution file, preserve its quiet zone, maintain strong contrast, choose the correct white-ink layer for clear or colored acrylic, and test the finished sign with multiple phones before delivery. Why Are Custom QR Code Signs Useful for Small Businesses? A QR code sign connects a physical customer touchpoint to a digital action. Instead of asking a customer to type a long web address, staff can direct them to scan a sign placed where the information is needed. Common uses include: Restaurant and café menus Customer feedback and review pages Guest Wi-Fi connection details Appointment and booking pages Social media profiles Product information and digital catalogs Event registration and feedback forms Loyalty programs and contact pages A single business may need several signs with the same visual identity but different destinations. For example, a café may use one QR code for its menu, another for Wi-Fi access, and a third for customer feedback. This creates a practical product opportunity for sign makers: the business can order a coordinated set rather than a single generic display. 8 QR Code Sign Ideas for Restaurants and Small Businesses Sign type Typical placement Digital destination Production consideration Restaurant menu sign Dining tables, counter, host station Digital menu or ordering page Readable code at normal table distance Customer review sign Checkout counter, reception desk Business review page Use neutral review wording and follow platform policies Guest Wi-Fi sign Café tables, hotel lobby, waiting area Wi-Fi connection details Keep network name and access details current Booking sign Salon, studio, clinic reception Appointment booking page Test the booking flow on mobile Social media sign Retail counter, event display Official social profile Use the correct profile URL Product information sign Shelf, showroom, product display Product page or digital catalog Match each code to the correct item Event sign Registration desk, venue entrance Registration or event information Confirm the event URL remains active Feedback sign Table, checkout, service area Customer feedback form Keep the request optional and easy to understand Which Materials Are Suitable for UV Printed QR Code Signs? Material selection affects the appearance, print workflow, durability and scan performance of the finished sign. A material that looks premium in a product photo is not automatically the best choice for every location. Material Appearance UV printing considerations Suitable applications Clear acrylic Modern, transparent, premium White ink may be needed behind the code and artwork; control reflections Table signs, counter displays, reception signs Frosted acrylic Soft, diffused appearance Confirm that the printed code has enough contrast against the chosen background Café displays, salons, boutique signs White acrylic Clean, high-contrast background Often straightforward for dark QR artwork; test the exact surface finish Menu signs, booking signs, product displays Colored acrylic Strong brand styling A white underbase may be needed to prevent the substrate color affecting the artwork Branded counter signs and promotional displays Coated wood Warm, natural appearance Surface coating, grain and flatness can affect adhesion and image consistency Rustic cafés, restaurants, hotels Coated metal Durable, industrial appearance Confirm the coating and ink adhesion before production Reception plates and business information signs For acrylic products, see EraSmart's UV Printer for Acrylic guide . For wood signs, surface preparation and material testing are covered in How to Print on Wood . Clear Acrylic QR Code Signs Clear acrylic is popular because it gives a clean, contemporary look and can be used with stand-offs, bases or tabletop holders. However, transparency creates a printing challenge: CMYK ink printed on a clear substrate may not provide the same visual opacity as it would on white material. A white-ink backing layer can create a more opaque background behind the QR code and colored artwork. The exact layer order depends on whether the sign is printed from the front or reverse side and on the printer's RIP workflow. Do not assume that every transparent design needs white ink everywhere. A selective white layer can preserve transparent areas while giving the code a controlled background. Wood QR Code Signs Wood is a good visual fit for rustic restaurants, cafés, hotels and independent retail stores. The grain can become part of the design, but raw wood may be porous or uneven. Use a clean, flat, tested blank. Dust, oil, wax, moisture and surface coatings can affect print appearance and adhesion. If a business needs consistent brand colors, a suitable white layer may help reduce the influence of the wood tone. Frosted and Colored Acrylic Frosted and colored acrylic can create distinctive branded signs, but the QR code still needs a strong visual contrast. Avoid placing a dark code on a dark substrate or a light code on a light substrate. Test the finished combination under the lighting conditions where the sign will be used. How to Design a QR Code That Scans Reliably QR code design should be treated as a functional part of the product, not simply a graphic element. The QR Code development information published by DENSO WAVE specifies a quiet zone at least four modules wide on all four sides of a QR Code. A module is one of the small square units that form the code. Keep this margin clear of text, borders, logos, decorative patterns and other printed elements. See DENSO WAVE's QR Code margin guidance . 1. Preserve the Quiet Zone Do not crop the white margin around the code to make room for a logo or decorative border. If the design area is limited, reduce the amount of surrounding decoration or choose a larger sign. 2. Use Strong Contrast A conventional dark code on a light, matte background is a reliable starting point. Avoid low-contrast color combinations, gradients inside the code modules, busy photographs behind the code, or decorative textures that interfere with the square pattern. 3. Choose a Practical Printed Size There is no single minimum physical size that works for every QR code. The required size depends on the amount of encoded information, the QR version and module count, print quality, scanning distance, camera performance and lighting. A code intended to be scanned from a nearby tabletop can be smaller than one intended to be scanned from a standing position across a counter. Make a sample at the intended finished size and test it using typical customer phones from the expected distance. DENSO WAVE also explains how QR symbol size is determined by module size and symbol version in its QR Code printing FAQ . 4. Keep the Code Artwork Clean Use a vector file where possible, or export a sufficiently high-resolution raster file at the final print dimensions. Avoid repeatedly resizing a small screenshot. Do not add rounded corners, decorative dots, gradients or a logo inside the code unless the resulting code is generated and validated for that design. 5. Consider Reflection and Glare Glossy acrylic can reflect windows, ceiling lights and direct sunlight. A sign may scan well in a workshop but become difficult to scan when placed under restaurant lighting. Test the finished sign in the actual environment. Consider the placement angle, nearby light sources and whether the code surface is likely to be scratched or covered by fingerprints. Static QR Codes vs. Dynamic QR Codes The type of QR code affects how a business can maintain its sign after installation. Type How it works Can the destination change? Main consideration Static QR code The destination information is encoded directly in the QR symbol The printed code itself cannot be edited; a new code normally requires a new print Simple when the destination is stable Dynamic QR code The symbol points to a redirect address that forwards visitors to another destination The redirect target can be changed if the redirect service or domain remains under control Depends on the redirect provider, domain and ongoing service For a restaurant menu, a business-controlled redirect URL can be useful when the menu page changes but the printed sign does not need to be replaced. The business should understand who owns and maintains that redirect address. A dynamic QR code is not automatically permanent. If a third-party service expires, changes its terms or stops operating, the redirect may stop working. For long-term business signage, a domain or redirect service controlled by the business is often easier to manage. Before printing, open the destination on a phone and confirm that it is the correct page, loads properly and works without requiring an unexpected login. How to Make Custom QR Code Signs with a UV Printer A UV flatbed printer can print the QR code and the sign artwork directly onto compatible flat acrylic, coated wood and other tested rigid materials. The following workflow is designed for small-batch commercial production. Step 1: Confirm the Customer's Requirements Collect the information before preparing the artwork: Business name and logo Sign type and intended placement Final sign dimensions and thickness QR destination URL or approved QR artwork Preferred material and color Quantity and number of design variations Stand, base, holes or mounting requirements Required delivery date For multi-location businesses, label each destination clearly. A menu code for one branch must not accidentally be assigned to another branch. Step 2: Generate and Verify the QR Code Generate the QR code from the final destination URL using a trusted QR generation workflow. If the customer supplies an existing QR file, ask for the original vector or high-resolution artwork rather than a low-quality screenshot. Before layout, scan the digital code with more than one phone. Confirm that it opens the correct destination and does not contain a spelling error, obsolete URL or unwanted redirect. Keep the original QR artwork unchanged in a separate production folder. Step 3: Build the Sign Layout Create a master template with fixed areas for: Business logo and name Short instruction such as Scan for Menu QR code and quiet zone Optional contact details Decorative elements Safe margins and mounting features Keep the QR code large enough for its intended scan distance. Do not allow the logo, text or decorative border to enter the quiet zone. For orders with several different QR destinations, use a spreadsheet to map each sign ID to its approved URL and artwork filename. Step 4: Set Up White Ink for Clear or Colored Acrylic For clear acrylic, a white-ink backing layer can improve the opacity and contrast of the QR code. For colored acrylic, white ink may help prevent the substrate color from changing the appearance of the code and other artwork. The correct print order depends on the viewing side: Front printing: Artwork is printed on the customer-facing side. Confirm the surface finish and protection requirements. Reverse printing: Artwork is mirrored and printed on the back of clear acrylic so it can be viewed through the front. The CMYK and white-ink order must be configured for the actual printer and RIP workflow. Always make a physical sample. Check the sign from the intended viewing side before producing the full order. Step 5: Prepare and Position the Blank Remove protective film as appropriate for the material and production process. Clean the print surface using a method approved for the blank. Remove dust, fingerprints and residue. Position the sign flat and securely on the printer platform. For repeat orders, use a positioning jig or fixed reference stops so each blank occupies the same location. Check the material thickness and printhead clearance before printing. Do not assume that blanks from different suppliers have identical thickness or flatness. Step 6: Print a Sample Before the Batch Print one complete sign first. Inspect: QR module edges and overall sharpness Contrast against the background White-ink coverage where required Text legibility Artwork alignment Surface defects, dust or visible marks Then scan the physical print with multiple phones. Test it at the expected customer distance and under realistic lighting. A successful scan from the design file does not prove that the printed sign will scan successfully. Step 7: Batch Print, Inspect and Pack Once the sample passes, save the approved artwork, RIP settings, material information and jig position. For a batch with multiple destinations: Assign a unique job or sign ID to each design. Match each ID to the approved QR destination. Keep files and blanks grouped by location or customer. Inspect the first pieces before continuing. Perform scan tests on finished samples from the batch. Count, sort and pack the signs according to the order list. How to Test QR Code Signs Before Delivery A production checklist should include both print quality and scanning performance. Test What to check Why it matters Destination test Code opens the approved URL Prevents incorrect or outdated links Multi-phone test Test with more than one current smartphone Camera and scanning behavior can vary Distance test Scan from the expected customer position Confirms the code is practical in use Lighting test Check normal indoor lighting and likely glare Detects reflection and contrast problems Angle test Scan from realistic viewing angles Useful for tabletop and counter signs Print inspection Check edges, contrast, alignment and defects Finds production issues Batch identity check Match sign ID to URL and customer Prevents signs being sent to the wrong location Important: AI-Generated QR Images Are Not Production QR Files AI-generated product photographs and technical illustrations can show the appearance of a QR code sign, but the QR patterns visible in generated images should not be treated as working codes. For an actual customer order, generate the QR code from the verified destination URL, preserve the code artwork, place it into the print file, and scan the physical finished sign before delivery. Special Considerations for Google Review QR Signs A review sign can make it easier for customers to find a business's review page, but the wording and the way the sign is used matter. Google Maps policy permits businesses to ask customers for genuine reviews based on real experiences. It prohibits incentives such as discounts, free products or services in exchange for reviews. It also prohibits selectively soliciting positive reviews or discouraging negative reviews. See Google Maps User-Generated Content Policy . Use neutral wording such as: Share Your Experience Feedback Welcome Tell Us About Your Visit Avoid wording that pressures customers to leave a five-star rating or suggests a reward for a positive review. The sign should provide access to the review destination, not attempt to influence the content or rating. Common QR Code Sign Printing Problems and How to Fix Them Problem Possible cause What to check QR code will not scan Incorrect source file, insufficient quiet zone, low contrast or print defects Verify the original code, margins, contrast and printed edges Code scans only at very close range Printed code is too small for the encoded data or intended distance Increase the code size and test at the actual viewing distance Code looks faded on clear acrylic No suitable white backing or insufficient contrast Review white-ink layer and viewing direction Code is reversed Artwork was mirrored or viewed from the wrong side Check front/reverse print direction and final viewing side Glossy sign is difficult to scan Reflections or glare Test placement and lighting; consider a less reflective presentation Different branches open the same page Incorrect file-to-URL mapping Use unique sign IDs and verify each destination before printing Ink adhesion is inconsistent Surface contamination or incompatible coating Clean and test the exact blank and finish Print alignment changes between pieces Blank movement or inconsistent positioning Use a stable jig and repeatable reference points How to Batch Produce 30, 50 or 100 QR Code Signs Batch production is not simply printing the same design many times. Commercial orders often contain different business names, URLs, branch details or sign formats. The safest approach is to standardize the blank and layout while controlling the variable information. Example order Recommended workflow 30 signs for one restaurant One approved template, one destination, fixed jig and a batch scan check 50 signs for several branches Unique branch IDs, separate QR files, a destination spreadsheet and grouped packing 100 signs for multiple businesses Job folders, customer-approved proofs, version control, batch records and final quantity reconciliation These are workflow examples, not printer throughput claims. Actual production time depends on sign dimensions, layout, ink coverage, print mode, loading, cleaning, finishing and inspection. For repeatable positioning, a jig can hold several blanks in a fixed arrangement. Before using it, confirm that the total layout fits within the printer's effective print area and that every blank remains flat and secure. How Much Does It Cost to Make Custom QR Code Signs? A useful quote should include more than the acrylic blank and ink. It should account for artwork setup, QR verification, printing, finishing, bases or hardware, inspection and packaging. Use this calculation: Cost per sellable sign = (blank + ink and consumables + labor + hardware + packaging + allocated setup cost + expected rework cost) ÷ sellable quantity For a custom order, separate one-time setup from repeat production: Setup: Artwork preparation, QR generation or verification, template creation and sample approval. Production: Blank, ink, printer time, cleaning and handling. Finishing: Cutting, edge finishing, stand or base assembly and protective packaging. Quality control: Destination checks, physical scan tests and batch reconciliation. Delivery: Packing, shipping and any location-based sorting. A restaurant chain ordering multiple signs may need different artwork for each branch. That variable-data work should be included in the quote rather than treated as identical repeat printing. Do not promise a fixed profit margin without using actual supplier costs, labor time, reject rates and local selling prices. Which EraSmart UV Printer Is Suitable for QR Code Signs? The right printer depends on the sign dimensions, material, number of pieces per layout and whether the production workflow needs direct printing on clear acrylic or other compatible rigid blanks. EraSmart A4 UV Printer XP600 The EraSmart A4 UV Printer XP600 uses a single XP600 printhead and a CMYK+WW ink configuration. Its listed platform size is 210 × 300 mm, with an effective print size of 180 × 290 mm and a listed printing height of 0–125 mm. It can be considered for compact QR counter signs, small acrylic displays, nameplates and other products that fit within the effective print area. When preparing the layout or jig, use the effective print size rather than the platform's outside dimensions. EraSmart A3 MAX UV Printer XP600 The EraSmart A3 MAX UV Printer XP600 has a listed printing size of 300 × 450 mm , a maximum listed printing height of 130 mm and an integrated suction platform. The larger working area offers more flexibility for larger signs or arranging multiple small blanks in one layout. The actual number of signs per run depends on each blank's dimensions, spacing, artwork and production settings. When to Choose a Larger UV Printer If the main products are large menu boards, wall signs, directional panels or multiple signs arranged in one production layout, compare the required dimensions with the available printer range on the EraSmart UV Printer category page . For flat acrylic signs, direct UV flatbed printing is generally the relevant workflow. UV DTF is a different print-to-film process and should only be considered when the product shape or application makes a transfer workflow more suitable. How to Start a QR Code Sign Printing Business A focused product range is easier to sell and manage than offering every type of signage at the beginning. 1. Start with Three Standard Products For example: A small acrylic tabletop menu sign A counter sign for customer feedback or reviews A Wi-Fi or booking information sign Use a small number of standard sizes and base styles. This simplifies quoting, material purchasing and jig design. 2. Create Reusable Design Templates Prepare templates with fixed logo areas, instructions, QR placement and safe margins. Keep the destination QR artwork as a separate variable element so it can be checked independently. 3. Build a Customer Approval Process Before printing, ask the customer to approve: Business name and spelling Logo and colors QR destination URL Final QR code artwork Sign dimensions and orientation Quantity and branch allocation Save the approved proof with the order record. 4. Sell to Businesses That Need Multiple Touchpoints Potential customers include restaurants, cafés, hotels, salons, clinics, retail stores, event venues and local service businesses. A useful sales approach is to show a coordinated sample set rather than a single sign. It helps the customer understand how the same branding can be used across tables, counters and reception areas. 5. Offer Reorders and Updates Businesses may need additional signs when they open a new branch, replace damaged displays, update their menu or add a new booking destination. Keep the artwork template and production record, but always reconfirm the destination URL before reprinting. A previous QR file should not be assumed to remain correct forever. For more acrylic product applications, see UV Printer for Acrylic . For the complete equipment range, visit EraSmart UV Printers . Frequently Asked Questions About Custom QR Code Signs Can a UV printer print QR codes on acrylic? Yes. A UV flatbed printer can print a QR code directly onto compatible acrylic. Use a verified QR file, preserve the quiet zone, maintain strong contrast and test the finished sign with multiple phones. Do I need white ink for a clear acrylic QR code sign? White ink is often useful because it creates an opaque background behind the code and improves contrast on clear acrylic. The required layer order depends on whether the design is printed from the front or reverse side. How much blank space should be left around a QR code? DENSO WAVE specifies a quiet zone of at least four modules on each side of the QR Code. Keep this area free of text, borders, logos and decorative elements. What is the best material for a restaurant QR code sign? Clear, frosted or white acrylic is a common choice for modern restaurant signs. Coated wood can suit rustic interiors. The best material depends on the visual style, lighting, placement, cleaning requirements and tested print compatibility. Can I print a QR code on both sides of clear acrylic? A design can be printed for viewing through clear acrylic, including reverse-side printing, if the artwork is mirrored and the CMYK and white-ink layers are configured correctly. Test the finished sample from the intended viewing side. Can a printed QR code be changed later? A static QR code cannot have its encoded destination edited after printing. A code that points to a controlled redirect URL can lead to a different destination later, provided the redirect service or domain remains active and under the business's control. What size should a printed QR code be? There is no universal size for every use. The required size depends on the encoded data, module count, print quality, scan distance, lighting and phone camera. Test the finished code at the actual customer viewing distance. Can I put a logo in the middle of a QR code? A logo can interfere with scanning if it covers too much of the code. If a logo is required, use a QR generation workflow that supports logo placement and error correction, then test the final printed version on multiple phones. Do not simply place a logo over an existing code. Can I make different QR signs for multiple restaurant branches? Yes. Use a master design template with separate QR artwork and a branch ID for each location. Maintain a destination spreadsheet and verify every physical sign against its approved URL before packing. Is a glossy acrylic QR sign always easy to scan? No. Reflections from windows, lamps and overhead lighting can make a glossy sign difficult to scan. Test the sign in its intended environment and consider the viewing angle and surface finish. Are AI-generated QR codes suitable for printing? No. AI-generated QR patterns in illustrative images should not be used as working QR codes. Generate the code from the verified destination URL, place the original code artwork into the print layout and scan the finished physical sign. Create Custom QR Code Signs with EraSmart UV Printers Custom QR code signs combine practical business signage with personalized UV printing. Restaurants and small businesses can use them for menus, Wi-Fi, booking, product information and customer feedback, while print shops can produce coordinated sets for individual locations or multi-branch customers. The production workflow should always protect the function of the sign: verify the destination, preserve the quiet zone, maintain contrast, choose the correct white-ink setup for the material, and test the finished print under real scanning conditions. Explore EraSmart UV Printers and the EraSmart A4 UV Printer XP600 or A3 MAX UV Printer XP600 to compare print areas and evaluate a suitable workflow for your sign products. When requesting a recommendation, provide the sign material, finished dimensions, quantity per order and whether the design requires reverse printing or white-ink backing.
Compact entry-level model with L800 print head, ideal for small items and hobby projects (120*210mm print size).
L800 print head with 210*290mm print size, perfect for small businesses and personalized gifts (0-130mm print height).
DX7 print head with 350*450mm print size, suction platform, and CMYK+WW+VV for high-volume production.
XP600 print head with 350*450mm print size, 5㎡/H speed, ideal for medium to large production runs.
Dual XP600 print heads with 5.5㎡/H speed, CMYK+WW+VVVVVV for enhanced color gamut and productivity.
Dual XP600 print heads with 350*450mm print size, designed for industrial-grade continuous production.
Large-format 420*600mm printer with dual XP600 heads, perfect for signage, panels and large materials.
Dual XP600 heads with automatic lamination, specialized for UV DTF film printing (width up to 350mm).
Specialized for phone cases (TPV/PVC/wood/metal), with 10-inch display and 0-10mm adjustable height.